The first time I made buffalo wings at home, I’ll be honest—they were a mess. The skin was rubbery, the sauce slid right off, and I remember standing at the stove thinking, Why do these taste better everywhere else? It wasn’t for lack of trying.
I had followed a recipe word for word, but it didn’t feel right. Over the years, buffalo wings became one of those dishes I kept coming back to, tweaking a little here, adjusting a little there, usually for game nights, birthdays, or those evenings when everyone seemed hungry and impatient all at once. Eventually, after plenty of trial and error (and a few batches that went straight into the fridge for “later”), I figured out what actually matters when making great buffalo wings at home.
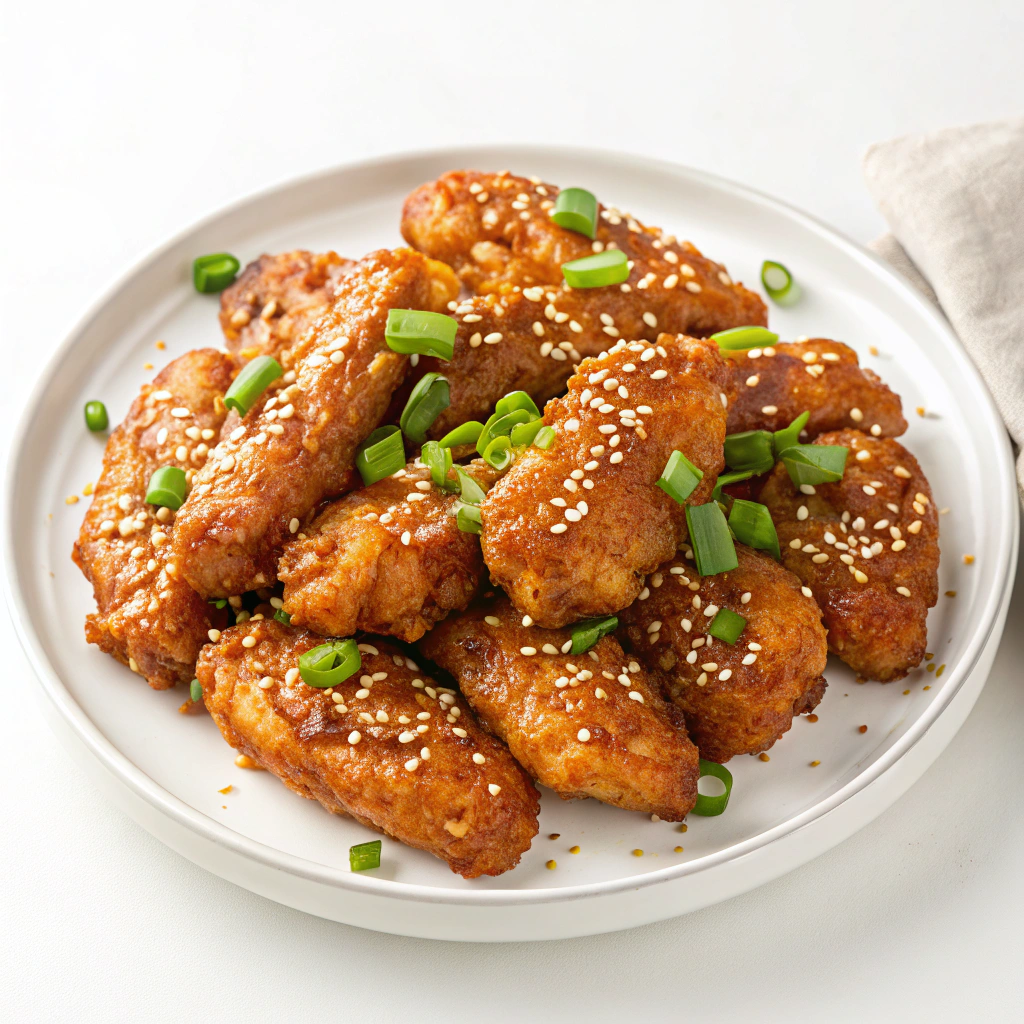
These wings are the result of all those lessons—crispy where they should be, juicy inside, and coated in a sauce that clings instead of pooling at the bottom of the bowl.

Why You’ll Love This Recipe
- Deep, classic buffalo flavor without being overwhelming
- Crispy skin without needing a deep fryer
- Simple ingredients you likely already have
- Perfect for gatherings, game days, or casual dinners
- Easy to scale up or down depending on the crowd
Ingredients You’ll Need
For the wings themselves, I always start with fresh chicken wings, split into flats and drumettes if they aren’t already. I’ve bought them pre-cut and I’ve cut them myself—both work fine, but pre-cut saves time and a bit of cleanup. You’ll need olive oil, just enough to lightly coat the wings, plus salt and freshly ground black pepper. I used to skip seasoning because I thought the sauce would do all the work, but that was a mistake I won’t repeat. A little seasoning on the wings themselves makes a noticeable difference.
For the buffalo sauce, you’ll need unsalted butter and a good-quality hot sauce. I usually reach for Frank’s RedHot because it has that familiar buffalo flavor and balances heat with tang, but I’ve used other vinegar-based hot sauces when that’s what I had. Garlic powder adds depth without overpowering the sauce, and a pinch of sugar helps round out the sharpness. Sometimes I add a splash of Worcestershire sauce if I’m feeling nostalgic—it’s not traditional, but it adds a subtle savory note I’ve grown to love.
How to Make It (Step-by-Step Instructions)
Step 1: Prepare the Wings
Start by preheating your oven to 425°F. This temperature is important—it’s hot enough to crisp the skin without drying out the meat. Line a large baking sheet with foil for easy cleanup, then place a wire rack on top if you have one. I didn’t always use a rack, but once I started, I never went back. It allows air to circulate around the wings, which helps them crisp evenly. Pat the wings completely dry with paper towels. This step feels tedious, but moisture is the enemy of crisp skin, and I’ve learned the hard way not to rush it.
Step 2: Season and Bake
In a large bowl, toss the wings with olive oil, salt, and black pepper until they’re evenly coated. Arrange them on the rack in a single layer, making sure they’re not touching. Crowding the pan steams the wings instead of roasting them, and that’s how you end up disappointed. Bake for 40 to 45 minutes, flipping halfway through. When they’re done, the skin should be deeply golden and feel crisp when tapped with a fork.
Step 3: Make the Buffalo Sauce
While the wings are baking, melt the butter in a small saucepan over low heat. Stir in the hot sauce, garlic powder, sugar, and Worcestershire sauce if using. Keep the heat low and whisk gently until everything is smooth and well combined. I always taste the sauce at this point and adjust—it’s easier to add more heat or sweetness now than later. Once the sauce is ready, keep it warm on the lowest heat or off the burner with a lid on.
Step 4: Sauce the Wings
Transfer the hot wings to a large bowl. Pour the warm buffalo sauce over them and toss gently until every piece is coated. I use a large spoon or tongs and take my time here; aggressive tossing can knock off that hard-earned crispy skin. Serve immediately while they’re hot and glossy.

Expert Tips for the Best Results
After making these wings more times than I can count, I’ve learned that patience is the secret ingredient. Taking the extra time to dry the wings thoroughly, spacing them out properly on the rack, and letting the oven do its job without opening the door too often makes all the difference. I’ve also learned not to drown the wings in sauce—starting with a moderate amount and adding more as needed keeps them crisp instead of soggy. These are small details, but they’re the ones that turn good wings into the kind people remember.
Variations & Substitutions
Over the years, I’ve played around with this recipe more than I probably should admit. Sometimes I swap half the butter for honey to make a sweet-heat version that disappears fast at parties. Other times, I’ve added smoked paprika to the sauce when I wanted something a little deeper and more complex. If you’re out of butter, olive oil works in a pinch, though the flavor is slightly different. I’ve even made these with cauliflower for friends who don’t eat meat, and while it’s not the same, the sauce carries just as much personality.
Serving Suggestions
Buffalo wings are at their best when served simply. I usually bring them to the table straight from the bowl, with celery sticks and carrot slices on the side for crunch and balance. A small dish of blue cheese or ranch dressing never hurts, especially if there are kids or heat-sensitive guests around. These wings fit right in at game-day spreads, casual family dinners, or even as a late-night snack when everyone’s still talking long after the plates are cleared.
Storage & Reheating Instructions
If you happen to have leftovers—which doesn’t happen often in my house—let the wings cool completely before storing them in an airtight container in the fridge. They’ll keep well for up to three days. When reheating, I avoid the microwave because it softens the skin too much. Instead, I spread them out on a baking sheet and reheat in a 375°F oven until warmed through and crisp again. The sauce will soak in a bit more overnight, which I actually enjoy, though the wings will be slightly less crunchy than the first day.
Recipe FAQs (Answered by Clara)
Can I make this ahead of time?
You sure can. I often bake the wings earlier in the day, let them cool, and keep them covered in the fridge. When it’s time to serve, I reheat them in the oven and toss them in freshly warmed sauce. It saves stress and still tastes great.
What’s the best way to get extra crispy wings?
The wire rack is my favorite trick, but drying the wings thoroughly and using high heat are just as important. I’ve tried fancy methods, but these basics work every time.
Can I serve them cold?
I wouldn’t recommend it. Buffalo wings really shine when they’re hot and fresh, with the sauce still clinging and the skin crisp.
How do I make them less spicy?
You can reduce the heat by using less hot sauce and more butter, or by adding a bit of honey or sugar. I’ve done this for family members who prefer milder flavors, and it still tastes like a proper buffalo wing.

Conclusion
Buffalo wings have a way of bringing people together, whether it’s around a TV, a crowded kitchen island, or a backyard table on a warm evening. This recipe is the one I come back to because it’s reliable, forgiving, and full of flavor without being fussy. I hope you give it a try, make it your own, and maybe even create a little tradition around it. If you do, I’d love to hear how it turned out for you—your kitchen stories matter just as much as mine.
Nutrition Information (Optional)
Approximate nutrition per serving (based on 6 wings):
Calories: 430
Protein: 28g
Fat: 34g
Carbohydrates: 3g
Sodium: 980mg

Buffalo Wings
Ingredients
- 2 lbs chicken wings split and tips removed
- 1 tablespoon baking powder for crispiness
- 1 teaspoon salt
- ½ teaspoon black pepper
Buffalo Sauce:
- ½ cup hot sauce Frank’s RedHot recommended
- 4 tablespoons unsalted butter
- 1 teaspoon garlic powder
- ½ teaspoon paprika
For Serving (optional):
- Celery sticks
- Blue cheese or ranch dressing
Instructions
- Preheat oven to 425°F (220°C).
- Pat wings very dry with paper towels.
- Toss wings with baking powder, salt, and pepper.
- Arrange wings on a wire rack set over a baking sheet.
- Bake for 40–45 minutes, flipping halfway, until crispy and golden.
- Meanwhile, melt butter in a saucepan and whisk in hot sauce, garlic powder, and paprika.
- Transfer cooked wings to a large bowl and toss with Buffalo sauce.
- Serve immediately with celery and dressing.
Notes
- Extra crispy: Use a wire rack and dry wings thoroughly.
- Air fryer option: Cook at 400°F for 20–22 minutes, shaking halfway.
- Heat level: Adjust hot sauce or butter ratio to taste.
- Sauce swap: Try honey Buffalo or garlic Parmesan.
- Storage: Best enjoyed fresh; reheat in oven or air fryer.