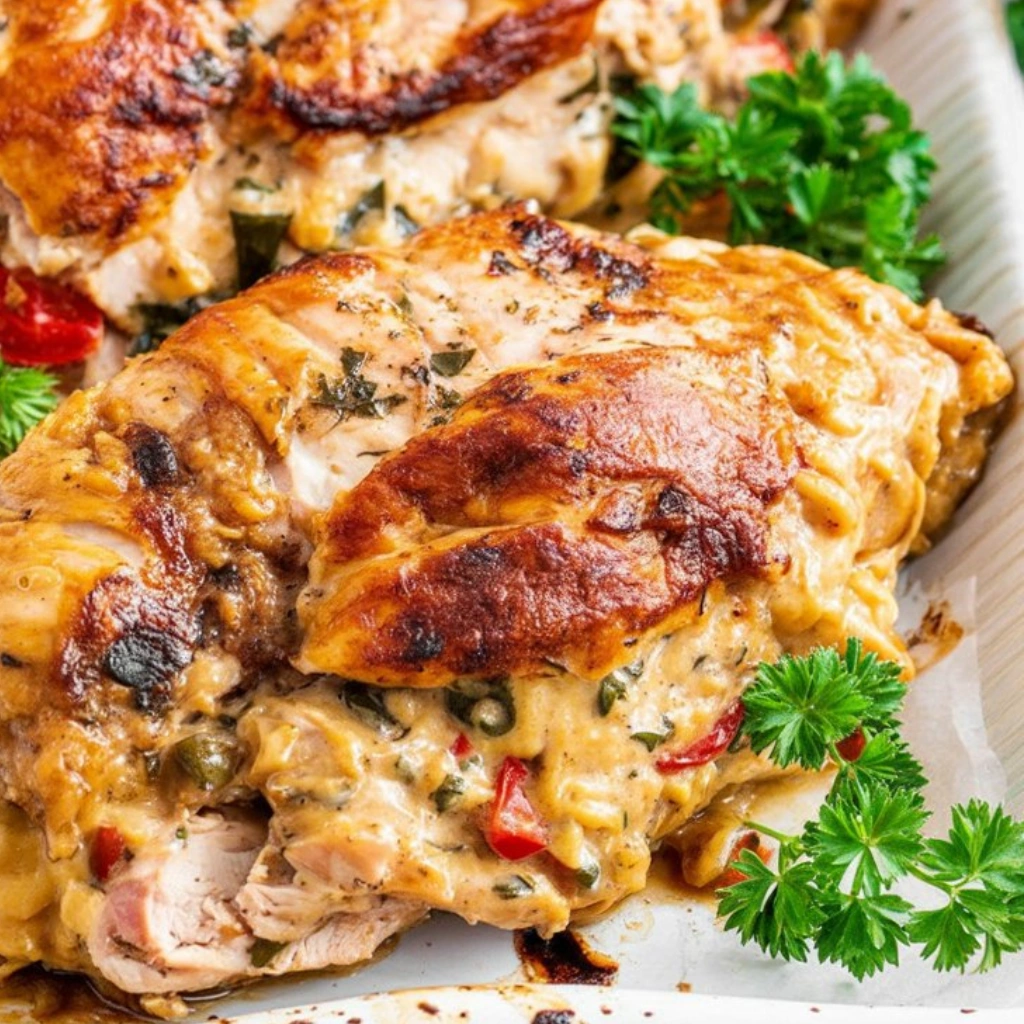
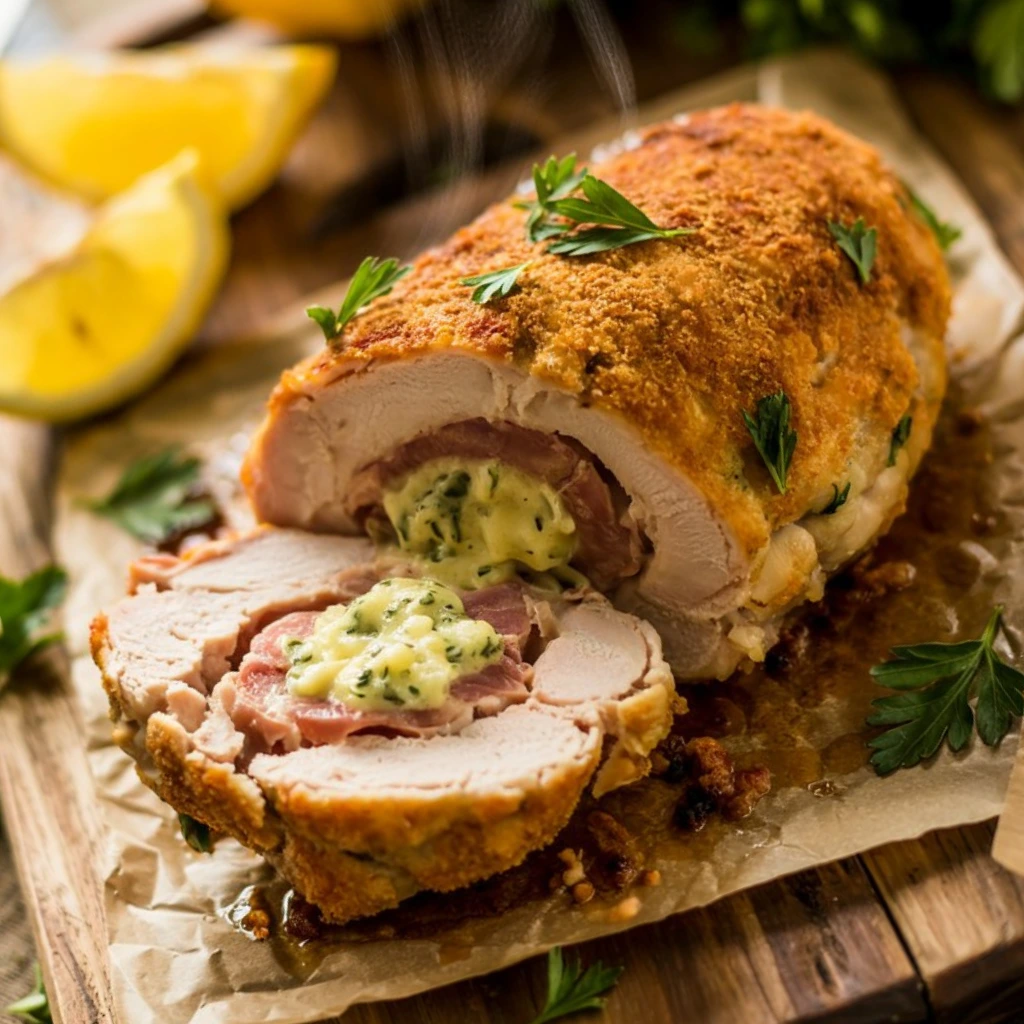
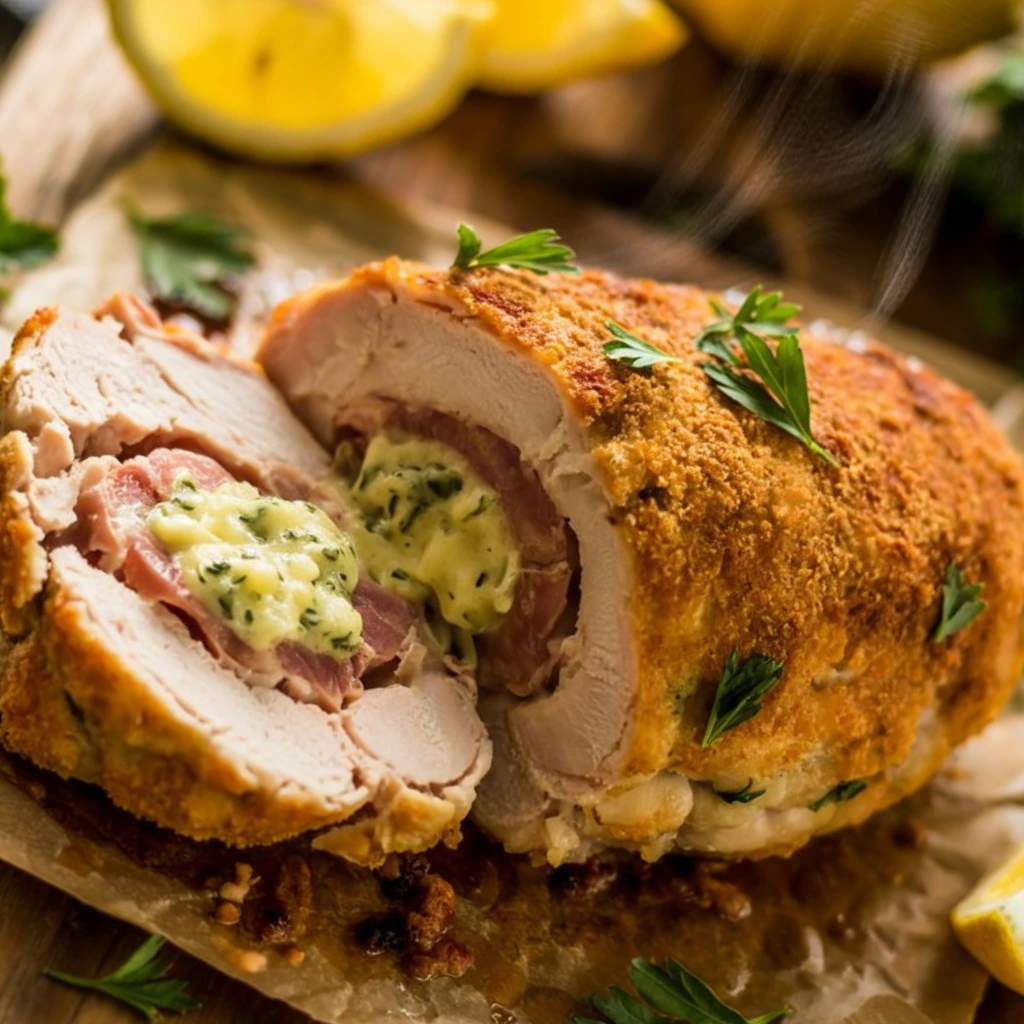
Chicken Kiev is one of the dishes that holds a special place in my heart. I tried it for the first time during a family meeting, and the crispy exterior was combined with a rich butter filling. I was first bent from cutting. It quickly became a favorite in my house, and I have been making my version since then. Current Golden Crust, Tender Chicken, and Unique Garlic-Herb Butter are not love inside? Today, I am excited to share this timely recipe with you so that you can make it at home and enjoy the same mouthwatering experience.
Chicken Kyiv is not just about taste; It is a dish that tells a story. Whether you are preparing it for a special occasion, to eat with a comfortable family, or simply to treat yourself to a comfortable food, the chicken is distributed at every level. Let’s dive in and find out how to do by step by step.

Why You’ll Love This Chicken Kiev Recipe
- Bursting with taste rich in each bite, garlic butter is melted inside the juicy chicken.
- Outside the outward, the inner tender a double breading ensures the correct crunch.
- Freeze and cook if there is a great make-ahead option disturbance!
- Elegant yet comfortable perfect for dinner parties or comfortable family food.
- Customable-It is easily suited for dietary preferences with gluten-free or dairy-free options.
Ingredients You’ll Need
Here’s everything you need to make authentic Chicken Kiev:
For the Garlic Herb Butter:
- ½ cup (1 stick) unsalted butter, softened
- 2 cloves garlic, minced
- 2 tablespoons fresh parsley, finely chopped
- 1 tablespoon fresh dill (optional but highly recommended)
- 1 teaspoon lemon juice
- Pinch of salt and black pepper
Tip: Soften the butter naturally at room temp—microwaving it can make it too runny to shape.
For the Chicken:
- 4 boneless, skinless chicken breasts
- Salt and pepper, to taste
For the Breathing:
- ½ cup all-purpose flour
- 2 large eggs, beaten
- 1 tablespoon of Dijon mustard (adds depth to the egg wash)
- 1 cup panko breadcrumbs
- ½ cup regular breadcrumbs (a mix gives the best crunch)
- 1 teaspoon paprika
- 1 teaspoon garlic powder
Optional Add-ins:
- Grated Parmesan in the breading for extra flavor
- Cayenne for a kick
How to Make Chicken Kiev (Step-by-Step)
1. Make the Garlic Herb Butter
In a small bowl, combine the softened butter, minced garlic, herbs, lemon juice, salt, and pepper. Mix well.
Spoon the butter mixture onto a sheet of plastic wrap. Roll it into a log about 1 inch thick, twist the ends, and freeze for 30–45 minutes or until firm. This step is essential—cold butter won’t leak out during cooking.
2. Prepare the Chicken
Place each chicken breast between two pieces of parchment paper or plastic wrap. Using a meat mallet or rolling pin, gently pound until about ½-inch thick.
Season both sides with salt and pepper.
3. Roll the Chicken
Cut the chilled herb butter into 4 equal pieces. Place a piece in the center of each flattened chicken breast.
Fold in the sides, then roll tightly like a burrito, securing the butter in the center. Use toothpicks to help hold the shape. Chill the rolled chicken for at least 30 minutes to firm up before breading.
4. Bread the Chicken
Set up your dredging station:
- Bowl 1: Flour
- Bowl 2: Beaten eggs with Dijon mustard
- Bowl 3: Mix panko, regular breadcrumbs, paprika, and garlic powder
Roll each chicken roll in flour, then egg wash, then the breadcrumb mixture—press gently to coat thoroughly.
For an extra crisp exterior, double dip: repeat the egg and breadcrumb step once more.
5. Fry and Finish in the Oven
Preheat your oven to 375°F (190°C).
Heat 1–2 inches of oil in a large skillet over medium-high heat. Once hot (around 350°F), fry each roll for 2–3 minutes per side until golden brown.
Transfer to a baking sheet and bake for 15–20 minutes until the internal temperature reaches 165°F and the juices run clear.
Let rest for 5 minutes before serving—this ensures the butter stays put when cut.
Expert Tips for the Best Results
- Chill the butter and chicken rolls. This prevents leakage and keeps the butter from melting very quickly.
- Use a thermometer; it ensures a completely cooked chicken without drying it.
- Double coat for additional crunch—especially helpful if you are serving guests and want an additional wow factor.
- Toothpicks are your friends do not leave to secure the roll; they will not expose themselves without help.
- Equally, pounds it will take longer to cook thick spots, and they can remain raw.
Variations & Substitutions
- Air Fryer Chicken Kiev – Cook at 375°F for 20 minutes, flipping halfway.
- Gluten-Free – Use gluten-free breadcrumbs and flour.
- Dairy-Free – Swap the butter with a dairy-free spread, like olive oil-based margarine.
- Stuffing Variations – Try sun-dried tomatoes, goat cheese, or basil pesto for unique twists.
- Mini Chicken Kiev Bites – Use chicken tenders and roll small butter pieces for party-friendly portions.
Serving Suggestions
Chicken Kiev is the star of the plate, so pair it with simple sides that complement its richness:
- Mashed or roasted potatoes
- Steamed green beans or asparagus
- Simple side salad with vinaigrette
- Buttered egg noodles or rice pilaf
- Dry white wine, like Sauvignon Blanc or Chardonnay
Perfect for:
- Date nights
- Holidays like Easter or Christmas
- Celebratory dinners or elegant family meals
Storage & Reheating Instructions
Storing:
- Refrigerate leftovers in an airtight container for up to 3 days.
- Freeze uncooked, breaded chicken rolls for up to 3 months.
Reheating:
- For best results, reheat in the oven at 350°F until warmed through (about 15–20 minutes).
- Avoid microwaving—it can make the breading soggy and cause the butter to leak.
Recipe FAQs (Schema-Ready)
Can I make Chicken Kiev ahead of time?
Yes! You can prepare and freeze the rolled, breaded chicken for up to 3 months. Just cook straight from frozen—add 10–15 extra minutes in the oven.
Why is my butter leaking out?
The butter may not have been cold enough, or the chicken wasn’t sealed tightly. Make sure the butter is fully chilled and the chicken is rolled securely.
Can I bake Chicken Kiev instead of frying?
Yes, but you won’t get quite the same crispy crust. Spray with oil and bake at 400°F for 25–30 minutes until golden.
What’s the origin of Chicken Kiev?
Chicken Kiev is believed to have originated in Eastern Europe, with strong ties to Russian and Ukrainian cuisine. It became popular in the mid-20th century and remains a retro classic.
Is Chicken Kiev spicy?
Not traditionally, but you can add cayenne or chili flakes to the breadcrumb mix if you like a kick!
Conclusion
Chicken Kiev is a dish that is never going out of style. With its crispy coating, juicy chicken, and buttery, flavorful filling, it’s a treat for the senses. I wish you provide this recipe a attempt – whether or not for a special event or a comfortable dinner at domestic. Trust me, when you’ve tasted the suitable Chicken Kiev, you’ll want to make it again and again. If you cherished this recipe, I’d like you to pay attention approximately your experience in the remarks underneath. Don’t forget to share this recipe with friends who’ll revel in it, too!
(Optional) Nutrition Information (Per Serving – Approximate)
- Calories: 520
- Protein: 38g
- Fat: 28g
- Carbs: 25g
- Fiber: 1g
- Sodium: 430mg
Chicken Kiev Recipe
Ingredients
For the Garlic Butter:
- ½ cup unsalted butter softened
- 4 cloves garlic minced
- 2 tbsp fresh parsley chopped
- 1 tbsp fresh dill optional
- 1 tbsp lemon juice
- 1 tsp lemon zest
- 1 tbsp chives optional
- Salt and pepper to taste
For the Chicken:
- 4 boneless skinless chicken breasts
- Salt and pepper to taste
- 1 cup all-purpose flour
- 2 large eggs beaten
- 1 cup bread crumbs preferably panko
- ½ cup vegetable oil or butter for frying
Instructions
Make the Garlic Butter:
- In a bowl, combine softened butter, garlic, parsley, dill, lemon juice, lemon zest, and chives.
- Season with salt and pepper, then mix until smooth.
- Roll the butter into a log using plastic wrap, and refrigerate it until firm (about 15–20 minutes).
Prepare the Chicken:
- Place each chicken breast between two sheets of plastic wrap or parchment paper and pound gently with a meat mallet until about ½ inch thick.
- Season both sides of the chicken with salt and pepper.
Stuff the Chicken:
- Take the chilled garlic butter and divide it into four portions.
- Place a portion of butter in the center of each chicken breast and fold the sides around it to enclose the butter.
- Secure the edges with toothpicks to keep the butter inside while cooking.
Coat the Chicken:
- Dredge each stuffed chicken breast first in flour, then dip in the beaten eggs, and finally coat with breadcrumbs.
Cook the Chicken:
- Heat oil or butter in a large skillet over medium-high heat.
- Carefully add the chicken breasts to the skillet and cook for 4–5 minutes on each side, until golden brown and crispy.
- If the chicken is browning too quickly, reduce the heat and cook a bit longer.
- Use a meat thermometer to ensure the internal temperature reaches 165°F (74°C).
Serve:
- Let the chicken rest for a few minutes before serving. Serve with a side of vegetables, mashed potatoes, or a fresh salad.
Notes
- Butter filling: Ensure the butter is cold and firm before stuffing the chicken, or it may leak out during cooking. Chilling it helps it stay intact.
- Alternative to frying: You can bake the stuffed chicken at 375°F (190°C) for about 25–30 minutes if you prefer a less greasy version.
- Use fresh herbs for the best flavor, but dried herbs can be substituted in a pinch.
- Panko breadcrumbs provide the crispiest coating, but regular breadcrumbs work too.